
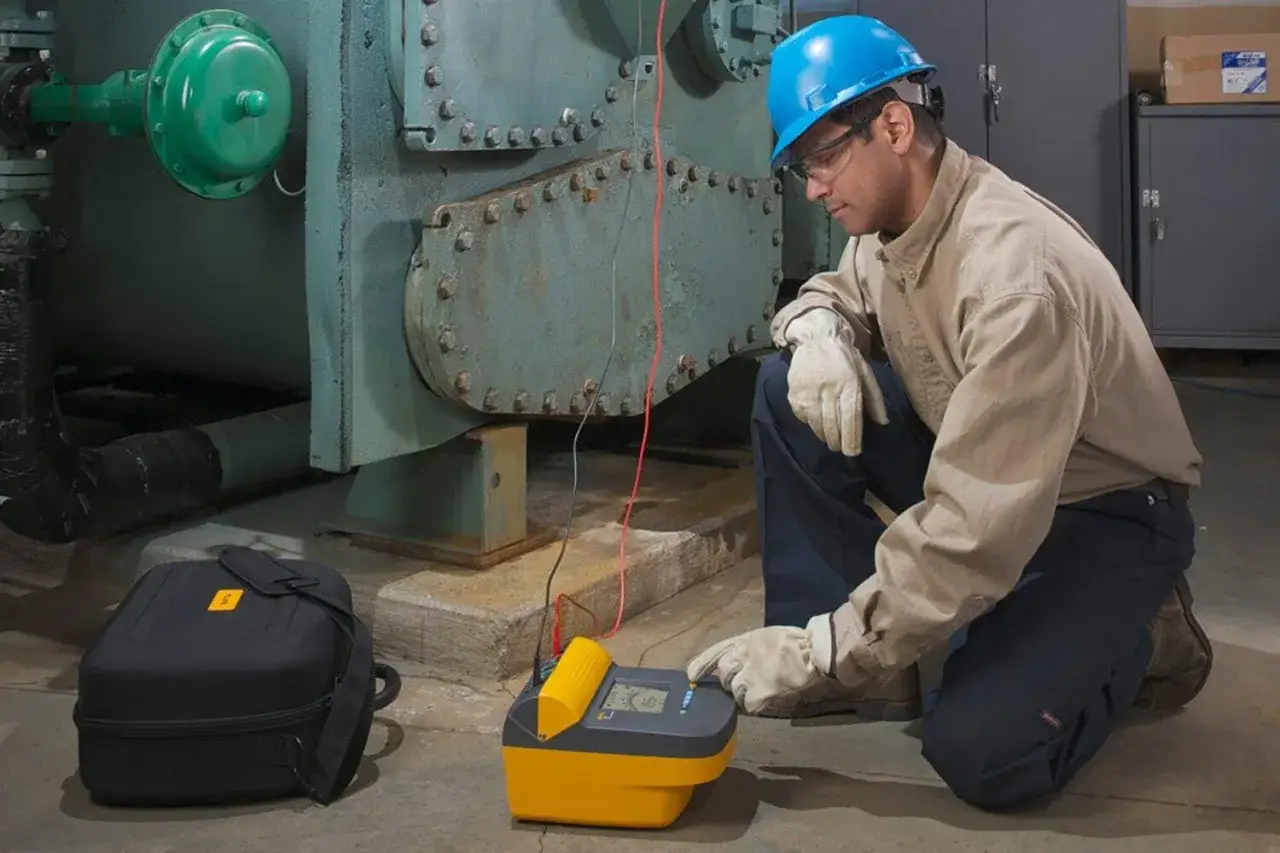
In practical electrical work, the question is less about terminology and more about choosing the tool that gives a trustworthy answer. When people ask which meter is used to measure insulation resistance, the correct instrument is an insulation resistance tester, usually called a megohmmeter or, in everyday shop-floor language, a Megger. That matters because the test is not just about getting a number; it is about spotting moisture, ageing, contamination, and hidden insulation damage before they become failures.
This article explains the right meter, how the test works, which voltage to use, and how to interpret the reading without overreacting to the wrong things. I’m keeping it practical and UK-focused so you can apply it to fixed wiring, panels, motors, and industrial equipment with confidence.
The practical answer is an insulation resistance tester
- The correct meter is an insulation resistance tester, also known as a megohmmeter.
- It applies a controlled DC test voltage and measures leakage through the insulation.
- In UK low-voltage work, 500 V DC is common, while 250 V DC is often used for sensitive equipment or SPDs.
- A standard multimeter is not a substitute because it does not stress insulation the same way.
- High readings usually indicate healthy insulation, but trend and context matter more than a single number.
The right meter is an insulation resistance tester
The instrument I would specify first is an insulation resistance tester. It is designed to apply a DC test voltage and measure the tiny current that leaks through insulation, then convert that into a resistance value. That reading is usually shown in megaohms (MΩ), and on higher-end testers in gigohms or even teraohms for large assets.
This is where the confusion starts for many people. A standard digital multimeter measures resistance at a very low test voltage, which is fine for basic continuity checks but not for proving the condition of electrical insulation. Insulation faults often only show up when the material is stressed at a much higher voltage, so a multimeter can miss the problem completely.
| Tool | What it does | Why it is or is not suitable for insulation resistance |
|---|---|---|
| Insulation resistance tester | Applies a DC test voltage and measures leakage through insulation | Correct tool for the job |
| Multimeter | Measures low-voltage resistance, voltage, current, and continuity | Useful for general diagnostics, but not a proper insulation test |
| Continuity tester | Checks whether a conductor path exists | Good for bonds and conductors, not for insulation quality |
| Hi-pot tester | Applies a high voltage to prove dielectric withstand | Related, but it is a different test with a different purpose |
That distinction matters on site. If I am checking a cable, motor winding, consumer unit, or control panel, I want an instrument built for insulation testing, not a general-purpose meter trying to do a specialist job. Once that is clear, the next question is how the test actually works and why the reading is meaningful.
How the test works in practice
An insulation resistance tester works by applying a known DC voltage across the insulation and measuring the resulting leakage current. Healthy insulation lets almost no current pass, so the calculated resistance is very high. Damaged, damp, dirty, or aged insulation leaks more current, and the reading falls.
In the field, I treat this as a condition test, not a yes-or-no ritual. A stable reading gives me a lot more confidence than a flickering one, and I pay attention to whether the value is consistent between conductors, phases, and similar circuits. On longer cables and larger machines, the tester may also need to discharge stored energy after the test, which is why good instruments include automatic discharge and voltage indication.
Some testers also offer a guard terminal. That is a useful feature when surface leakage, dirt, or moisture on the outside of the insulation could distort the result. The guard helps you separate true insulation leakage from leakage travelling over the surface of the material. In industrial environments, that can make the difference between a useful diagnosis and a misleading reading.
Once you understand the mechanism, the question becomes which test voltage is appropriate for the circuit in front of you.
Picking the correct test voltage
Test voltage is not a detail to skim past. It affects both the reading and the risk of damaging connected equipment. In UK practice, 500 V DC is a common choice for many low-voltage fixed wiring tests, while 250 V DC is often selected where sensitive electronics, surge protective devices, or connected equipment could be harmed by a higher test voltage. Higher-voltage testers are used for motors, cables, and other assets that need a more demanding check.
| Test voltage | Typical use | What I would watch for |
|---|---|---|
| 250 V DC | Sensitive circuits, SPDs, and equipment that may be damaged by 500 V testing | Lower stress on the circuit, but still enough to reveal insulation weakness |
| 500 V DC | Common choice for many low-voltage fixed wiring checks | The default for a lot of site testing, provided the circuit can tolerate it |
| 1000 V DC | Motors, larger cables, and more robust equipment | Useful when I need more stress to expose weak insulation |
| 2500 V to 5000 V DC | High-voltage equipment and larger industrial assets | Usually handled by specialist testers and trained personnel |
The IET’s guidance around BS 7671 aligns with that practical split: if a higher test voltage could damage equipment or cannot be used safely because of connected components, a lower voltage is justified. That is why I would never pick a voltage blindly. I choose it based on the circuit, the equipment, and the risk of collateral damage. From there, the real-world applications become much easier to understand.
Where insulation resistance testing matters most in modern electrical systems
In industrial automation and smart manufacturing, insulation testing is not just about fixed wiring. I would use it on motors, cables, switchgear, control panels, heaters, transformers, and distribution circuits. It is especially useful after installation, after maintenance, after a fault, and before energising equipment that has been out of service for a while.
Some of the most common problems are boring in the best possible way: moisture ingress, dust, oil mist, chemical contamination, thermal ageing, and mechanical damage. Those issues rarely fail loudly at first. They usually show up as a slow decline in insulation quality, which is exactly why regular testing catches problems before they become outages.
In practice, I see the value most clearly in places where downtime is expensive. A damp motor winding in a production line, a contaminated panel in a plant room, or a damaged cable route in a warehouse can all create intermittent faults long before a complete failure appears. An insulation resistance tester gives you an early warning signal, which is far more useful than waiting for a breaker trip or a smoke-filled enclosure. That leads naturally to the harder question: what does the number actually mean?
How to read the numbers without misdiagnosing the circuit
A high reading is usually good, but I would not treat “high” as a universal pass without context. The shape of the reading, the circuit type, and the comparison with earlier results all matter. A circuit that used to read strongly and now drops sharply is telling a different story from a circuit that has always sat at a modest but acceptable level.
| Reading pattern | What it often suggests | What I would do next |
|---|---|---|
| Very high and stable | Generally healthy insulation | Record it and compare it with future tests |
| Low at first, then improves after drying or cleaning | Moisture, dirt, or surface contamination | Inspect the environment and retest after corrective action |
| Low and steady even after cleaning | Possible insulation breakdown, carbon tracking, or cable damage | Investigate the circuit, not just the reading |
| Reading jumps around | Poor connections, connected loads, or unstable surface leakage | Check isolation, leads, and the test setup |
Temperature and humidity also matter. Warm, dry insulation often reads better than cold, damp insulation, and that is one reason I always compare like with like when I review test histories. A single reading can be useful, but a trend is better. If the values are drifting over time, the circuit is usually telling you something before it actually fails.
Common mistakes that make a good circuit look bad
Most bad insulation test results are not caused by the tester itself. They are caused by the setup. The circuit may still be connected to electronics, surge protection, capacitive loads, or parallel paths that distort the result. On a modern installation, that is a very common way to get confused.
- Leaving sensitive equipment connected and then wondering why the test is odd or the equipment is unhappy.
- Forgetting SPDs, which can make a 500 V test inappropriate in some situations.
- Testing through parallel paths instead of isolating the circuit properly.
- Ignoring discharge after the test, especially on cables and capacitive circuits.
- Using the wrong instrument, such as a standard multimeter, and expecting a meaningful insulation result.
- Reading one value in isolation without comparing it with the rest of the circuit or previous records.
I also see people assume that any low reading means immediate failure. Sometimes it does, but not always. A damp panel room after a cold night can produce a different result from a genuinely damaged winding, and those situations need different responses. The job is to interpret the reading, not just collect it. Once the common traps are clear, the last step is choosing a tester that makes accurate work easier rather than harder.
What I would look for in a tester before using it on site
If I were selecting an instrument for regular work in the UK, I would want selectable test voltages, a clear resistance range, automatic discharge, and a proper safety rating for the environment I am working in. For industrial use, a good tester should also be comfortable in the hand, easy to read in poor light, and capable of logging results without turning every visit into paperwork.
A practical unit will usually offer 250 V and 500 V at minimum, and many models add 1000 V for more demanding assets. Larger industrial testers may go higher still. That range matters because one tool rarely fits every asset in a mixed site. The same contractor may be checking lighting circuits in one room, a motor control centre in another, and a cable run to a machine in the next.
For me, the real value of the test is not the instrument alone. It is the combination of the right voltage, good isolation practice, sensible interpretation, and a record of how the insulation is changing over time. That is the difference between a meter reading and a maintenance decision. If you are responsible for electrical systems, that is the answer worth keeping.